
Folded Tapped Horn Subwoofer Tuned to 17hz
17hz at 115db on 500 watts for $250. My Lilwrecker Build
| Part | Cost |
|---|---|
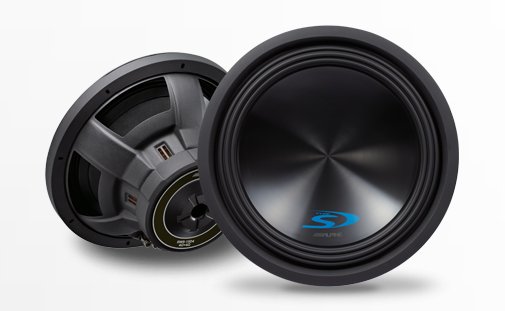
| Alpine SWS 15D 15" Driver | $120 |
| 4 4×8 sheets Advantech OSB | $110 |
| 2 Tubes Loctite PL Glue | $10 |
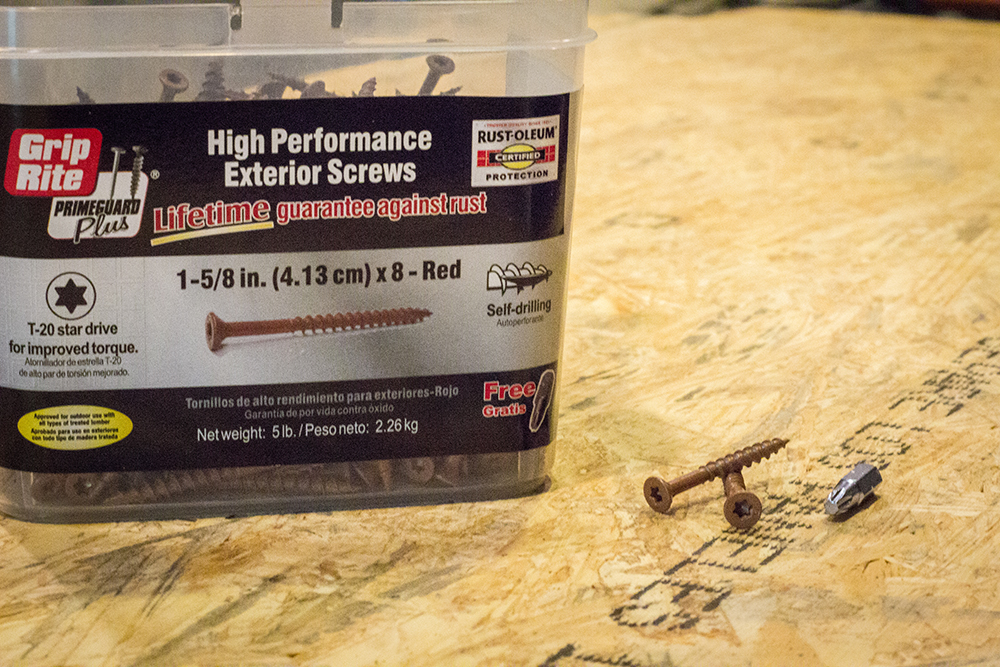
| 1lb Grip-Rite 1-5/8" Deck Screws | $5 |
| Speaker mounting hardware | |
| Terminal block of some kind | |
| TOTAL | ~ $250 |
Ok, so most people can’t hear much, if anything, below about 20hz. And all of that pounding, feel-it-in-your-chest, rumbly and explosive bass you love at concerts and in theaters is actually up around 60-100hz. So, then, why bother with a huge, huge speaker box tuned down to 17hz? You might just have to experience it.
* Update: I read that thing about 60-100hz in several places around the web when researching this build. After building this thing and playing with it and a tone generator, I can tell you that most of the components of my house certainly resonate somewhere in that range. For my money tough, the real feel-it-in-your-chest frequency is in the low 30s. I think my lungs must resonate at about 31hz. Ok, onward. *
It turns out that very loud infrasonic sound is not something humans normally experience very often, and when we do, it connects in some crazy visceral ways.
Very high amplitude infrasound is produced naturally by things like earthquakes and very powerful storms like tornadoes and hurricanes. We don’t really hear them like we do sound, or feel them like we do loud bass in the neighborhood of 80hz, but we do perceive them. They mostly just register as strange sense of dread or as an oppressive weight in the air, like an enormous power or sense of foreboding.
Hollywood has largely ignored infrasonics because it takes very large, very powerful audio equipment to produce them. Further, for a few reasons related to the way they work, most sound systems out there would burn themselves up without making a sound if you tried to play an infrasonic recording for very long. Recently though, with the protections and efficiency provided by digital amplifiers, movies have started including infrasonic effects, and they are a pretty imposing experience.
It turns out there are some very clever approaches to subwoofer design that can provide pretty impressive borderline infrasonic sound without spending a fortune on drivers and amps. They are very heavy, and very big physically, which makes them expensive to manufacture and distribute, not to mention tough to find room for in the average consumer’s living room. However, it turns out they are not all that complicated to build yourself. The one I finally went for is called a folded tapped horn.
Horns
Put simply, a horn maximizes the efficiency of the transfer of kinetic energy from an oscillator (like a speaker) to the air around it (the room). When an oscillator like a speaker or a tuba players lips is used out in the open, it wastes the majority of its energy thrashing the air immediately surrounding it in to turbulence, not cohesive sound waves. If you place that oscillator behind a properly shaped horn (called ‘horn loading’) though, it forces far more of the energy to be applied directly to setting up cohesive, directed compression waves.
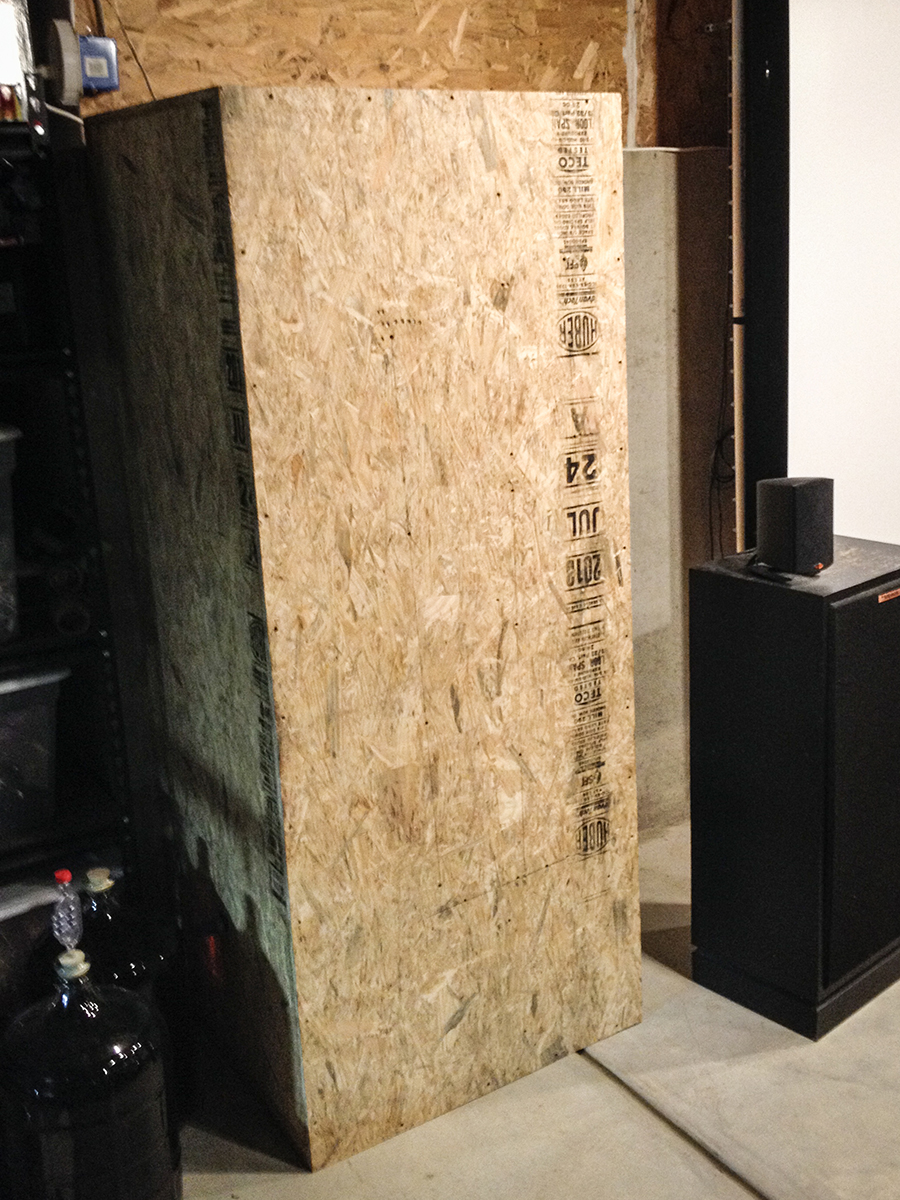
In order to work properly, the size of the horn must be tuned to the frequencies for which it is intended. The lower the frequency, the larger the horn. Higher frequencies work with horns only a few inches long, which is why they are often used on the tweeters in high end loudspeakers. On the other hand, a horn tuned for a subwoofer at 17hz for example, needs to be something like 25 feet long.
 Folding Horns
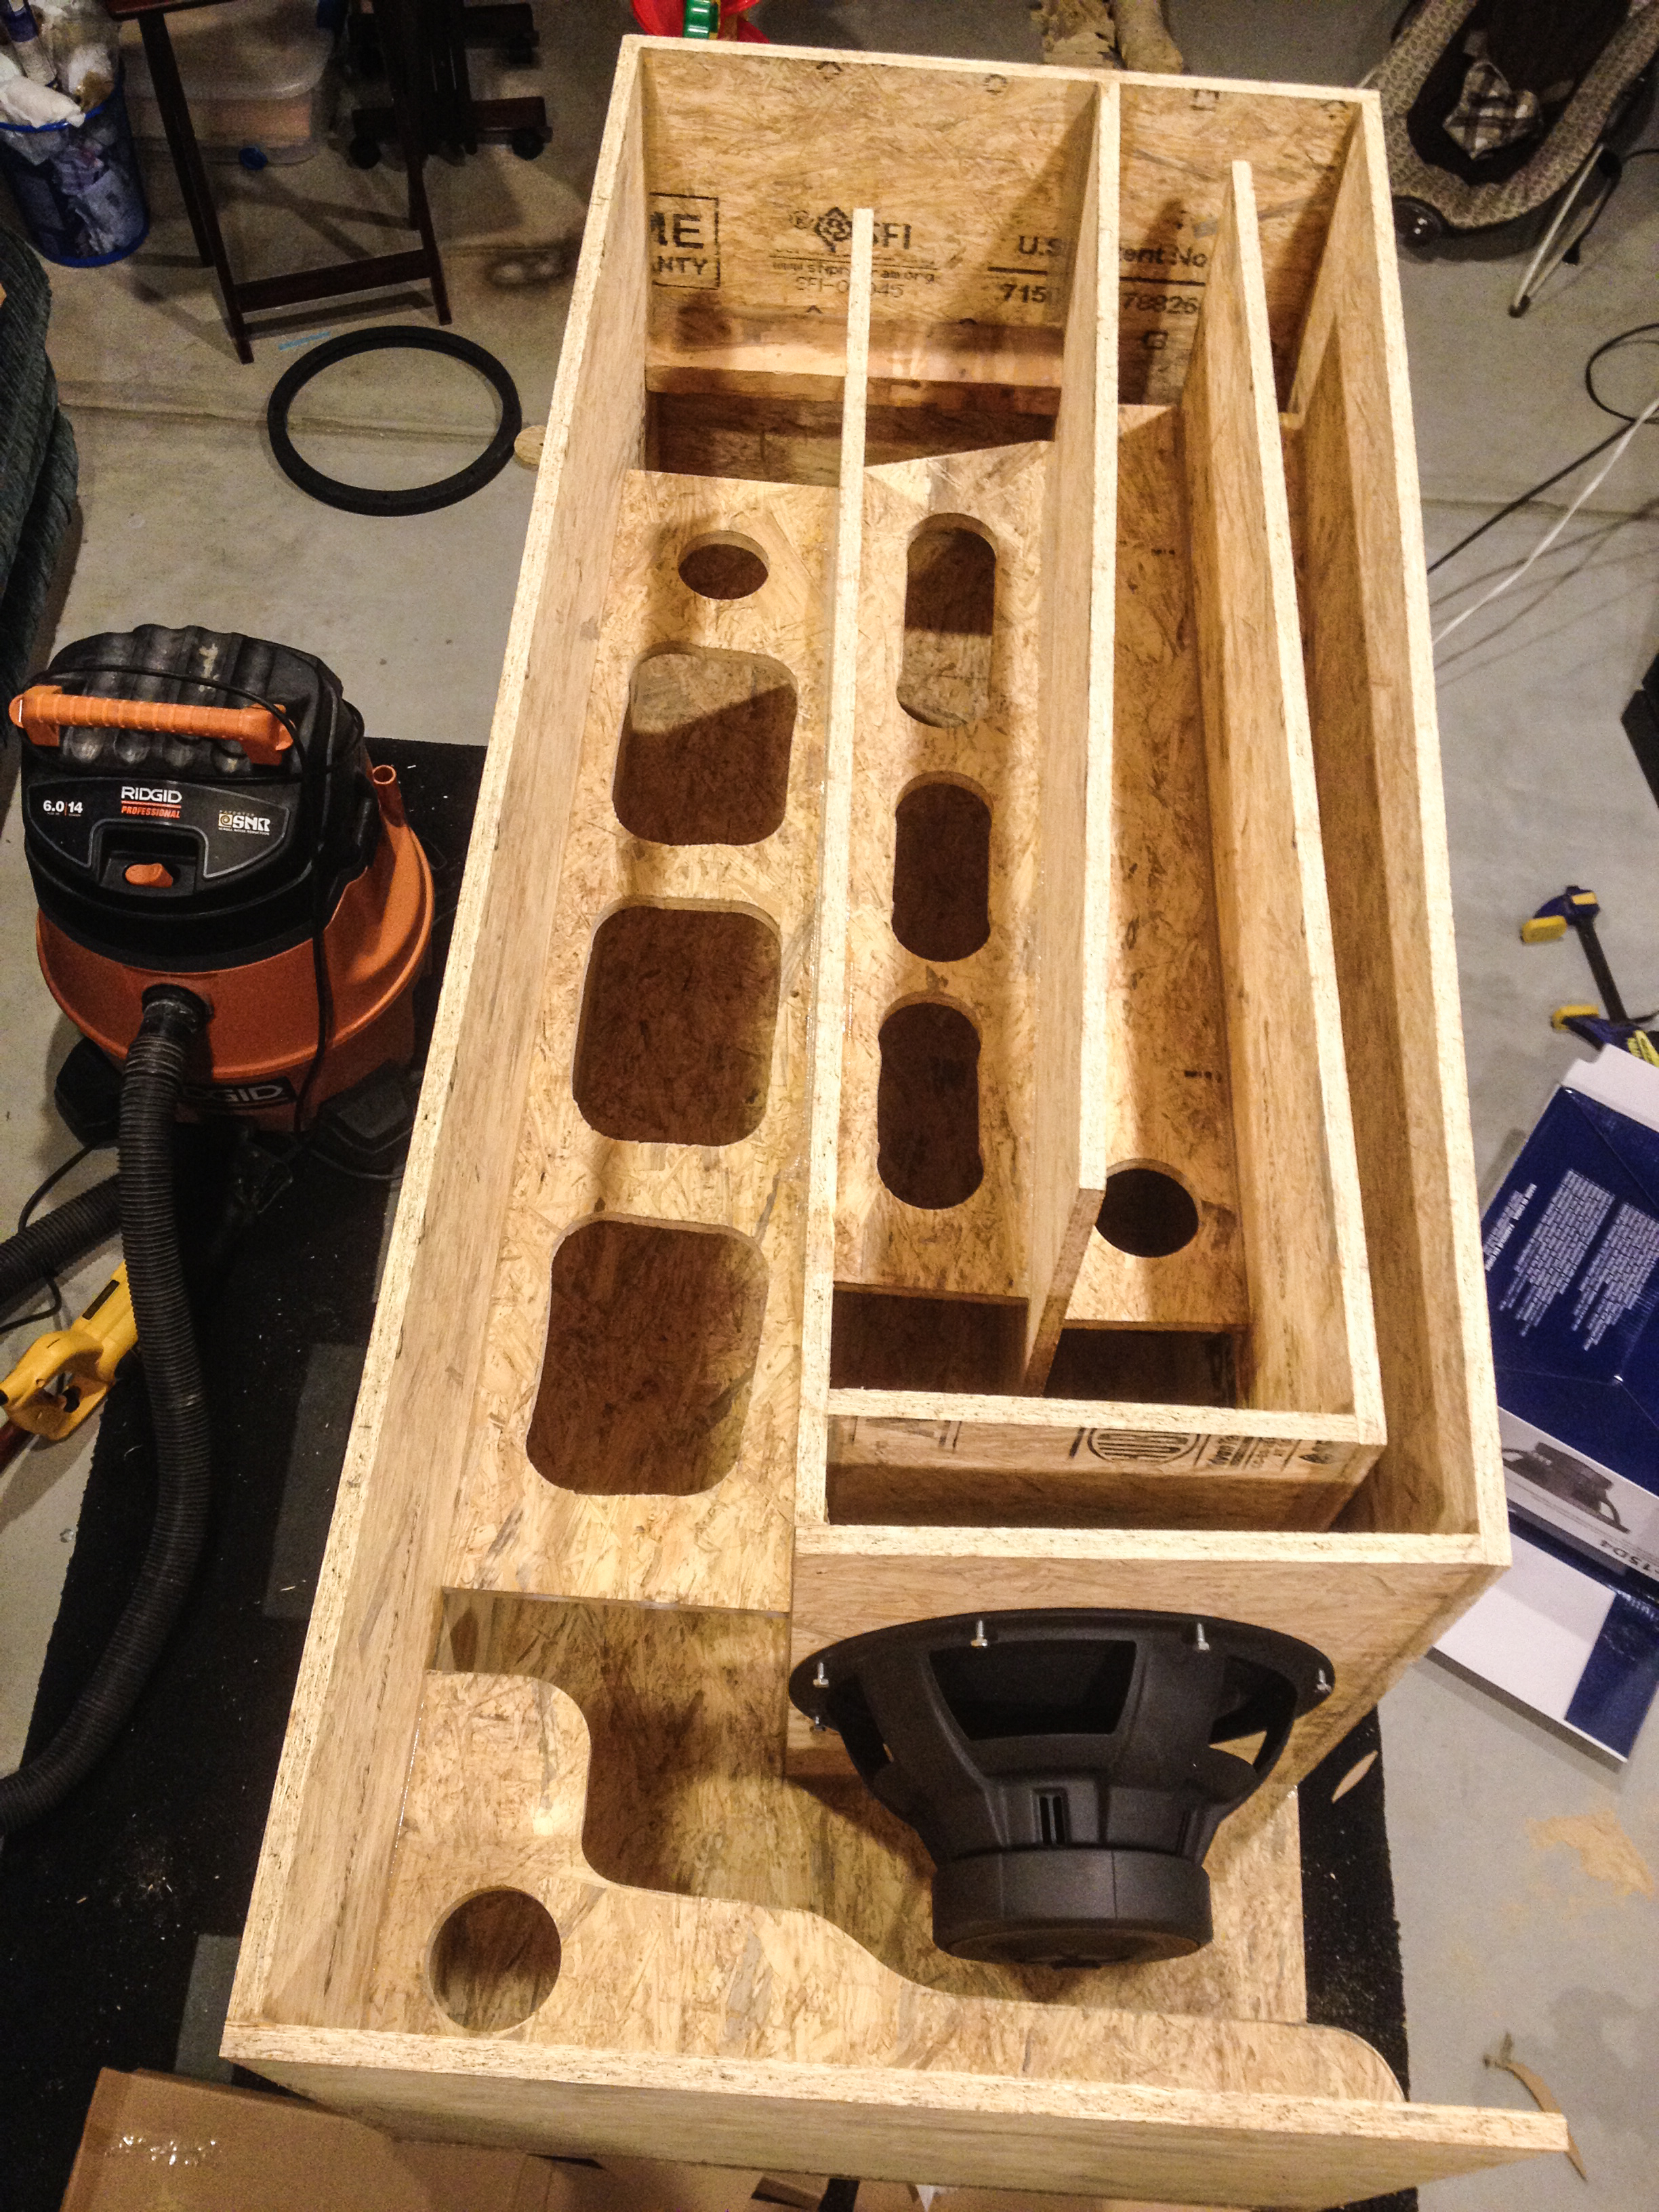
The first big feature of this design depends on the fact that the horn does not have to be straight to work, it can be folded up like a tuba and still work very well. Also, the tube that comprises the horn does not have to have to be round. The area of any cross section of the horn is very important, but the shape of the cross section is far less so. So to make a 25 foot horn for a subwoofer that will fit in the living room, first we flatten the horn in to a rectangular cross section, and then we fold it up to fit it in to a box.
Tapped Horns
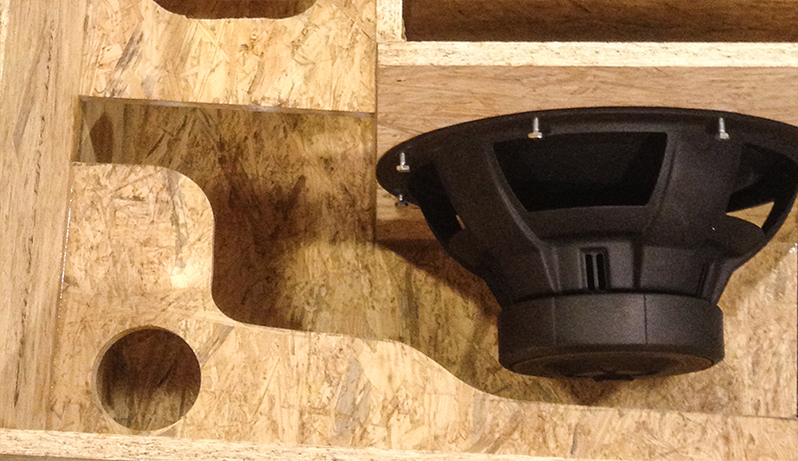
The second cool feature of this design is that the horn is ‘tapped’. You’ll notice that the front side of the speaker fires in to the throat of our folded horn, nothing special about that. You’ll also notice that the back side of the speaker is actually firing right in to the mouth of the horn. This is what is called a tap, and it is the really cool part.
Imagine the speaker advancing forward and setting up a compression wave in the horn. That compression wave travels out through the horn and passes across the back side of the speaker on the way out. Now you can imagine that if we placed the speaker in just the right place along the length of the horn, then at just the right frequency, the speaker cone would be retreating just as the compression wave passed behind it, adding to the pressure (amplitude) of the wave on its way past. Then of course as the rarefaction wave passed by the back of the speaker it would be advancing again, adding amplitude to the negative pressure component of the sound wave as well.
The effect is highly dependent on the frequency (or wavelength) of the sound. As you can imagine, a higher frequency (shorter wavelength) sound wave would leave the speaker cone retreating right in to to the depth of the rarefaction phase of the wave, defeating it, and badly distorting the resulting sound. So the tap is only effective for some narrow bands of frequency, and above or below them it is self defeating and adds terrible distortion (excepting the harmonic frequencies of the horn). Fortunately, the band over which it works is more than wide enough to cover the expected frequency range of a very low frequency subwoofer, and the results are very impressive in terms of efficiency (loudness per watt) and distortion (precise reproduction of the recorded wave form).
*Note: Thanks to the commenter for pointing out that the length of the wave, not the speed at which it travels, is the variable in question in the above paragraph, as well as the accepted nomenclature for the anatomy of a horn.*
Plans
DIY subwoofer legend Lilmike graciously shared the plans for this box on avsforum. You can get them there and read through tons of comments and questions from people who have built them.
 Driver
One of the great strengths of custom designed boxes is that you can design for the strengths and weaknesses of a particular driver. In this case, the box is designed to compliment a short list of drivers that include the dual coil Alpine SWS-15D2 (or Alpine SWS-15D4, a 4 ohm per coil version). I went with this one because I found a great deal on an open box, and because it was designed to be a barbaric, indestructible trunk thumper, so hopefully it will be rugged and dependable.
Wood
The wood you use matters. The big factors to consider are stiffness, density, weight, and cost. You want as much of the first two as possible while keeping the last two under control.
The wood must be stiff to minimize distortion. You can see how this works if you imagine the compression wave flexing the walls of the horn outward on the way by. As it moves out, it takes some of the compression (amplitude) out of the wave, then after the wave goes by, it reintroduces smaller compression waves while it settles back in to place. The pressure can also shove the shared internal walls of the horn over in to the adjacent horn space, which reduces the pressure of the sound wave on one side of the panel, and increases it on the other. All this means that the final sound waves generated by the speaker will be different from the waveform stored in the recording. This is what we call distortion, and the more of it you have, the more your sub will sound like a boomy, muddy, rumbly mess.
It also needs to be dense in the sense of being free of voids that can serve as little echo chambers that make the wood resonate. Cheap plywood is full of holes and knots in the internal layers, and is usually not glued together evenly at all. Cheap plywood boxes ring and buzz and flutter terribly, especially under the stress of huge high compression bass.
Multicore, void free, hardwood based plywood can actually be better than solid hardwood, because the grain of each ply is rotated 90 degrees from those beside it, providing rigidity in more directions. Unfortunately, it is also outrageously expensive.
MDF works ok, but weighs several times what a good plywood does. With small speakers thats not huge deal, but with this thing, you could end up with a box that weighs several hundred pounds.
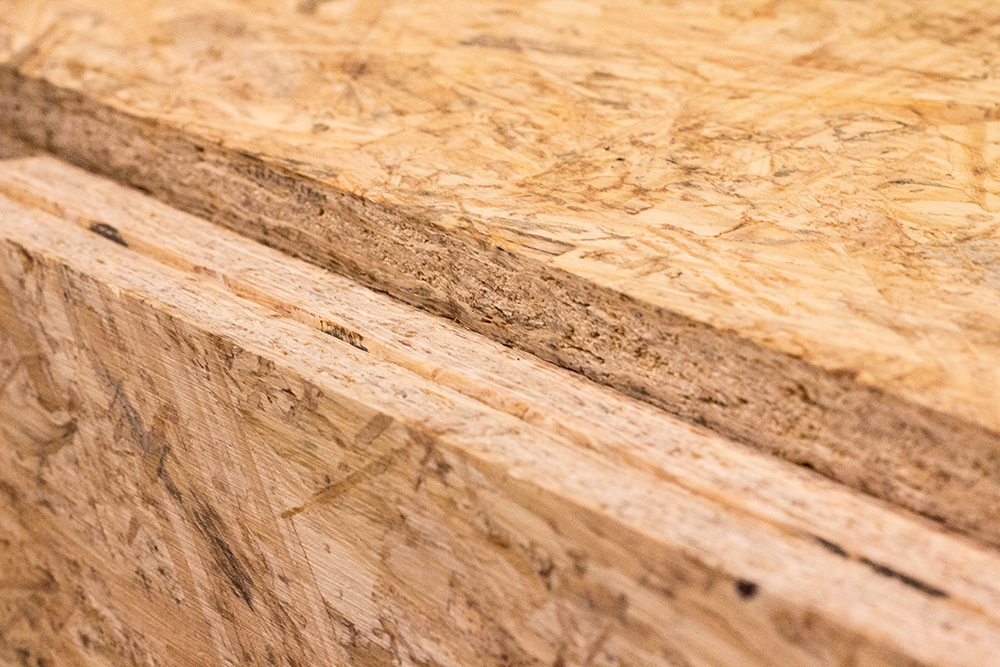
I happened to see that the local Lowes had a product called Advantech that is an engineered OSB subfloor. They brag about its very high stiffness and how light it is, and it was only a little more expensive than cheap ply. The only drawback was that it was subfloor material, which meant it had a tongue and groove along its length. I asked Lilmike to run numbers on his design with a slightly narrower box to account for ripping the groove off of the panels, and he said the difference seemed negligible. Booyah. OSB doesn’t finish as easily as hardwood ply, but since a black spray paint job works fine for me, it doesn’t make much difference. I was a bit worried about voids in the panels, but once the wood was cut it looked great.
Cutting
Imperfectly measured or wavy cuts make speaker building a real nightmare. Perfectly measured and perfectly straight cuts take very expensive equipment or lots of time, care, and skill. I found a local cabinet shop that was willing to take a stack of sheets and a cut list and do all the cutting work on an industrial grade table saw for less than $40. It might be cheating a bit, but unless you have extra wood for when you blow it, as well as the right tools and/or a weekend or two to get it right, this is money very well spent.
 Construction
I pretty much just followed the directions for putting it together. I used expensive, high grade deck screws because I have not been able to find wood screws that aren’t garbage. This project was not one I wanted to be riddled with snapped off, stripped out, or bent and mangled screws.
The results are incredible. I have only been able to supply about 100 watts (of the 500 the driver is rated for) from an old receiver I had laying around, but even at that I honestly worry that I am going to crack the basement windows. It makes clothing flutter from across the room.
The cannon fire from the fog in Master and Commander is incredibly menacing, and the little earthquakes caused by the feet of the aliens in War of the Worlds makes the size of them ten times more believable. Natural disaster movies take on a whole new dimension with this thing pounding the house apart around you 🙂
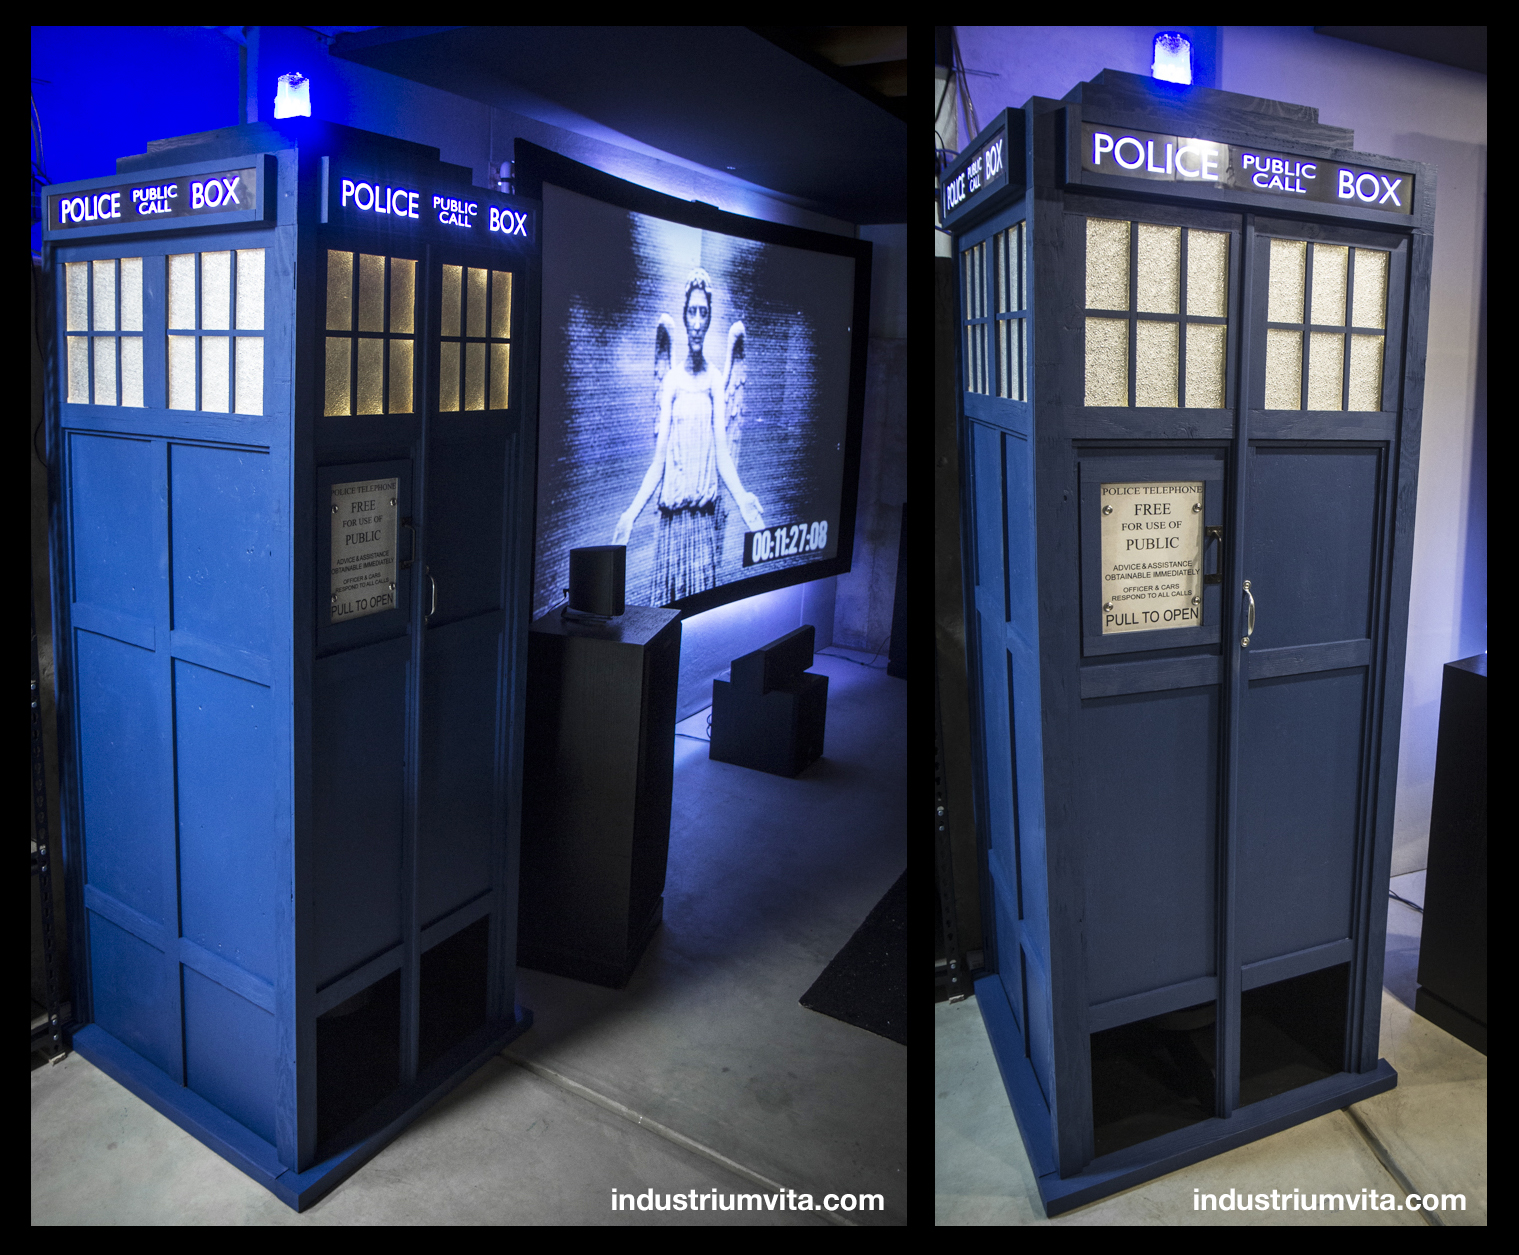 Update 3/2016: I LOVE THIS SUBWOOFER. Seriously. Build yourself one! Also, I thought of the perfect disguise for this monstrosity. I decided to dress this thing up like Dr. Who’s TARDIS! Check out my notes over on my writeup.
Leave a Reply